By Carlton Smith
Ever find yourself looking at a blog with a striking cover image, like Copyblogger or Olyvia Media?


These images draw you in, exemplifying the 1000-word worth (or more) of a picture.
The issue is: some of us have the ability to create striking visuals (the graphic artists, designers, photographers and the like) and some of us don’t. Like, really: DO NOT. Serious graphic handicap.
Are you doomed to fading into the background… or paying lots of money for a designer?
Nope. We’re going to show you – in three steps and two tools – how to create beautiful, designer-worthy images for your site and blog posts.
Finding a Striking Image for Your Background
You don’t want to use images that scream “I came from a stock photo site!” (even if that is, in fact, where you got them). Try to find images that are bold and authentic. One of our favorite sites for free photos is Pixabay. They have a very wide range of striking photos, all of which can be used for commercial purposes without permission or attribution. Unlike smaller royalty-free photo sites, you’re likely to find at least a few photos for almost any term you search for.
Need more options? Check out this list of 50+ sites for beautiful free photos where you won’t run into copyright issues. (Otherwise, you are endangering your business and finances, as demonstrated by the rash of letters from Getty Images threatening lawsuits a few years ago.)
Decide What Text You’re Going to Put On the Image
There are two different approaches as to the text you use on the blog cover image. Some use the exact or modified title of the blog post, like Social Media Examiner:

Some use supporting text (as in the Copyblogger image above). You can read here about why Copyblogger decided to use that approach. In their words: “We ran some tests and decided that we didn’t like the ‘double headline’ effect of images with headlines on them. So, we set out to write original text for each post image we create. And, it turns out, this image text serves as a kind of subhead to our main headline.” More recently, as you can see in the image, they’ve been extracting a quote from the post and using that as the text.
The Olyvia Media image above (and most of her blog post cover images) actually manages to get in both. She clearly designs her images to work well on Pinterest, with a portrait orientation, so she has plenty of room and uses it wisely.
Add Attractive-Looking Text
Your cover image text doesn’t just need to sound good. It needs to look good. If your site has distinct fonts and colors, pull from those. Either way, be consistent with the look of your image text. A Copyblogger or Olyvia Media image can be identified even before you see the brand name on the image – you want your images to be distinct and associated with you.
How do you add the text? We like using Canva, especially since they added the capability to add bands of translucent color, black or white over the image to make the text more readable.
Here’s how to do it:
Go into Canva and create an account if you don’t have one already.
Choose the shape of the image you want to create.

Upload your image and drag it to the image canvas.

Choose Element and the shape of the color background you want for your text. If you want a color band, just choose the square shape. Resize and place in the area where you want the text.

Click on the Transparency button and drag until you reach the desired translucency.

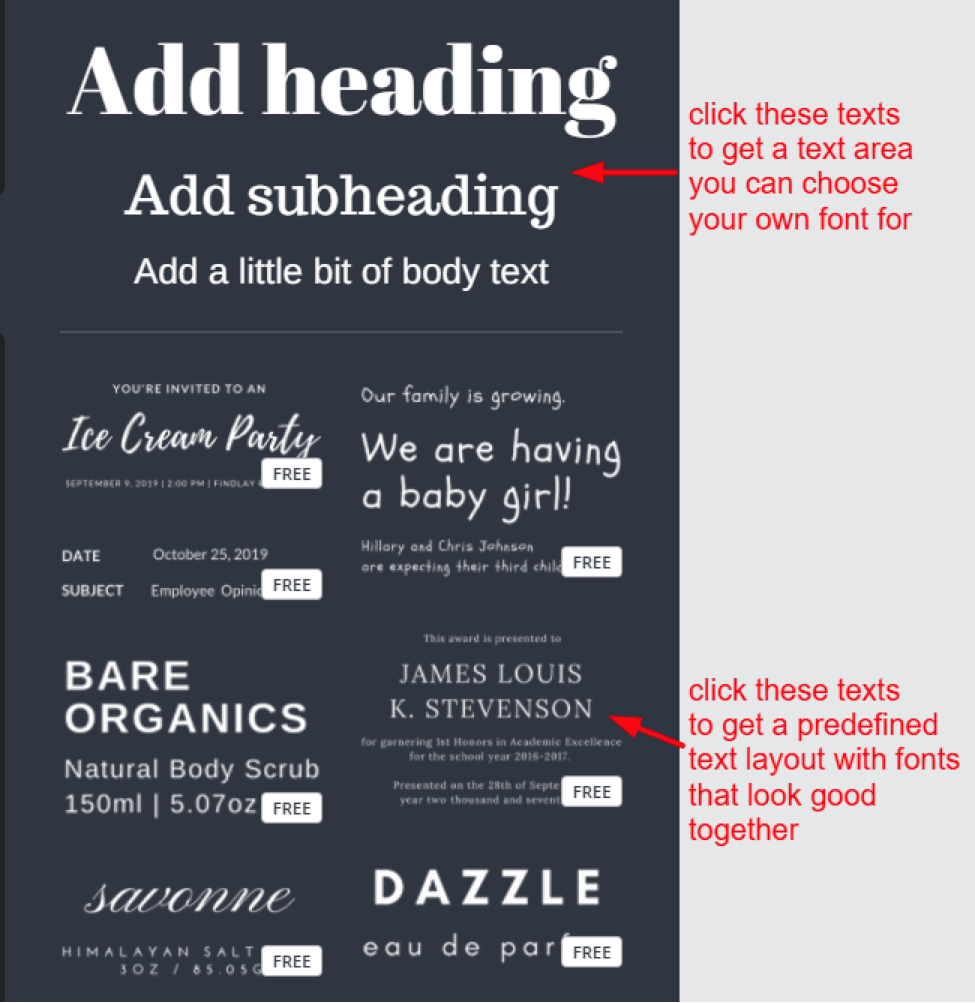
Then click the sidebar button to add Text.

Canva lets you choose from predefined text layouts designed by their staff, or have total control over your fonts and text layout.

And there you go!
A striking, eye-catching cover image, all ready to share on social media and pull your reader in.
What tools do you use to create cover images for your blog?

